Skip to content
No results
News
Lifestyle
Entertainment
About Us
Contact
News
Lifestyle
Entertainment
About Us
Contact
Search
Menu
Photo Gallery
← Back to full story
Trending now
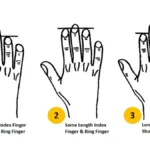
Your Fingers Can Tell You a Lot About Your Personality. What Kind of Fingers Do You Have?
5 Pilates Rituals To Start Your Morning Like A Wellness It-Girl
5 Reasons Why Pilates Is For Rehabilitation
7 Reasons Pilates Is The Most Underrated Longevity Practice
×
×